
Adjusting the valves on the VW Beetle and Bus T1/T2 (Type 1 engine) – step by step
In short: On the Type 1 engine of the VW Beetle, Karmann Ghia and Bus T1/T2 you set the valve clearance on a cold engine to 0.15 mm (0.006 in) for intake and exhaust valves – cylinder by cylinder in the firing order 1-4-3-2. With a feeler gauge, a screwdriver and two new valve cover gaskets the job takes about one hour.
At a glance
- Difficulty: easy – ideal for beginners
- Time: approx. 1 hour
- Fits: VW Beetle, Karmann Ghia, VW Bus T1 and T2 with Type 1 engine (1200–1600 cc)
- When: at every service, as a rule of thumb about every 5,000 km (3,000 miles), and whenever the engine ticks louder than usual
What you need
- Feeler gauge set with a 0.15 mm blade
- 2 x Type 1 valve cover gasket – always replace the old gaskets
- Flat-blade screwdriver and a ring spanner for the lock nuts
- Socket to turn the crankshaft at the pulley
- Drip tray and rags for the oil left in the valve cover
- Tip: the Type 1 service kit already includes the valve cover gaskets – together with spark plugs, points, distributor cap and oil strainer for a complete service.
Why valve clearance matters
There has to be a small gap between rocker arm and valve stem so that the valve still closes properly when the engine is hot. If the clearance is too small, the valves no longer seat properly: they can warp and burn, compression drops and the engine runs rough. The exhaust valves of the air-cooled boxer are particularly sensitive – a suspiciously quiet engine is not a good sign. If the clearance is too large, the valve train clatters, the cylinders fill less well and power drops.
The correct value
- 0.15 mm (0.006 in) for intake and exhaust valves, measured on a cold engine – this is the value from the VW repair manual for the Type 1 engine and the value we use in our workshop.
- Older engines have their own values – see the table. If there is a sticker on the fan housing stating the valve clearance, that value applies to your engine.
- Engines with hydraulic lifters (e.g. late Mexican Beetles) are not adjusted. The Type 4 engine in the T2 has different values – this guide covers the Type 1 engine only.
| Engine | Valve clearance intake / exhaust |
|---|---|
| Type 1 engine 1200–1600 cc (Beetle, Karmann Ghia, Bus T1/T2) – standard value | 0.15 mm (0.006 in), cold |
| Old 30 hp engine (1200 cc, in the T1 up to May 1960) | 0.10 mm (0.004 in), cold |
| Early 34 hp engine (1200 cc, in the T1 from June 1960) | 0.20 mm (0.008 in), cold or warm up to max. 50 °C oil temperature |
Source of the special values: VW repair manual Transporter (1959–63). The engine code letter tells you which engine is fitted.
Cylinder numbers and order
Viewed from the rear, cylinders 1 and 2 are on the right, 3 and 4 on the left. Cylinders 1 and 3 sit at the front (towards the middle of the car), 2 and 4 at the rear next to the pulley. Adjust in the firing order 1 – 4 – 3 – 2.
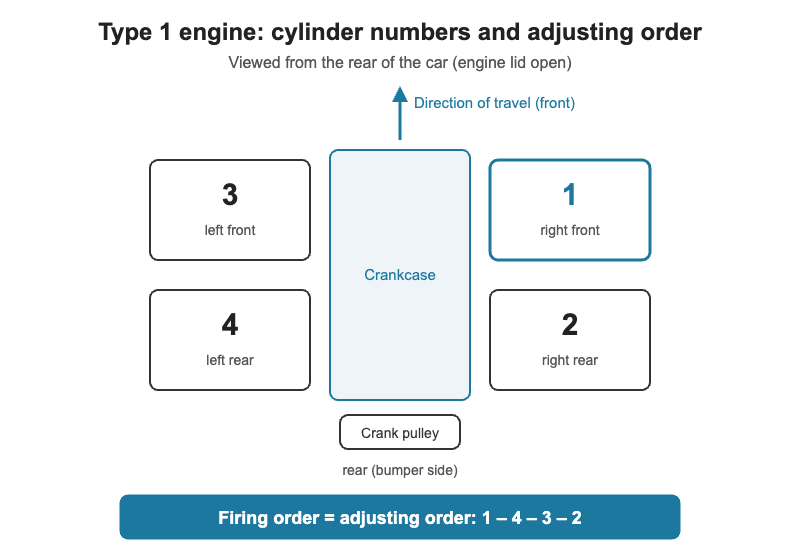
Step by step: adjusting the valves
- Let the engine cool down. Ideally adjust the valves in the morning after the car has stood overnight. A warm engine gives wrong readings.
- Remove the valve covers. Place a drip tray underneath, lever the retaining bail down with a screwdriver and take off the cover. On Beetle and Bus you can reach them well from below or from the side; removing the rear wheel may help.
- Remove the distributor cap. This lets you see which cylinder the rotor points to. If you like, also remove the spark plugs – the engine is then easier to turn.
- Set cylinder 1 to TDC. Turn the crankshaft clockwise at the pulley until the TDC notch on the pulley lines up with the crankcase split line and the rotor points to the cylinder 1 mark on the distributor rim. Check: both rocker arms of cylinder 1 now have some play and move freely. If not, turn the crankshaft one more full turn.
- Measure the clearance. Slide the 0.15 mm feeler blade between adjusting screw and valve stem. It should slide through with a light, even drag – not jam and not wobble.
- Adjust. Loosen the lock nut and turn the adjusting screw with the screwdriver until the clearance is right. Hold the screw with the screwdriver, tighten the lock nut – and always measure again, as the screw tends to move while tightening. Repeat on the second valve of the cylinder.
- Next cylinder. Turn the crankshaft half a turn (180°) clockwise. The rotor turns a quarter turn anticlockwise and points to the next cylinder in the firing order. Adjust cylinders 4, 3 and 2 one after the other – each time checking that both rocker arms have play.
- Reassemble. Wipe the sealing faces on cylinder head and valve cover clean and dry, fit new gaskets, fit the cover and make sure the bail snaps in securely. Refit distributor cap and spark plugs, start the engine and check the valve covers for oil after a short test drive.
Workshop tips
- Worn adjusting screws: If the tips of the adjusting screws are dished, the feeler gauge gives a false reading – the real clearance is larger. Replace them, e.g. with the set of M8 valve adjusting screws and matching lock nuts.
- Glue the gasket in: Glue the new gasket into the valve cover with a little sealant and leave the cylinder-head side dry. It won't slip when fitting and comes off cleanly next time.
- Leaking valve covers? If you keep fighting oil at the covers, consider bolt-on aluminium valve covers.
- Keep the value handy: A valve clearance sticker for the fan housing reminds you and every future mechanic of the correct value.
Common mistakes
- Adjusting the wrong cylinder: If the piston is at overlap TDC instead of firing TDC, one valve is slightly open and the reading is worthless. Always check that both rocker arms have play.
- Measuring on a warm engine: The clearance is larger when warm – set to 0.15 mm it will be too tight when cold.
- Not re-measuring after tightening the lock nut: The adjusting screw often turns slightly while tightening.
- Bail not seated properly: The valve cover soon leaks and oil drips onto the heat exchanger.
Frequently asked questions
How often do I need to adjust the valves on a Beetle?
As a rule of thumb at every service, about every 5,000 km (3,000 miles). After an engine rebuild or new cylinder heads, check the clearance again after the first few hundred kilometres.
The engine ticks after adjusting – is that normal?
A light, even ticking is normal on the Type 1 engine and actually a good sign. If one valve is clearly louder than the others, check clearance, adjusting screw and rocker arm there again.
Can I adjust the valves on a warm engine?
No. The value of 0.15 mm applies to a cold engine. On a warm engine you would set the clearance too tight.
Does this guide also apply to the VW Bus T2?
Yes, for T2 buses with the Type 1 engine (1600 cc). The Type 4 engine (1700–2000 cc) has different values, and later Type 4 engines have hydraulic lifters.
Matching parts and further guides
- VW Beetle engine parts
- VW Bus T1 engine parts and VW Bus T2 engine
- Repair manuals for Beetle, Bus and Karmann Ghia
- More guides: Ignition timing on the Type 1 engine and Oil change and cleaning the oil strainer as well as Tensioning and replacing the fan belt, plus the Type 1 engine torque specs – all guides are in our Guides & Tips overview.
All work is carried out at your own risk. If in doubt, ask a professional workshop.