
Converting to electronic ignition on the VW Beetle and Bus: conversion kit, 009 distributor or 123ignition
In short: An electronic ignition replaces the contact points on your VW Beetle or Bus – no more adjusting points or checking dwell. You have three options: a conversion kit for your original distributor, a complete 009 distributor with electronics or a 123ignition distributor – or you go straight for a complete kit with distributor, coil and leads. What matters is the right ignition coil (approx. 3 Ω for conversion kits), the correct polarity (red to terminal 15, black to terminal 1) and re-setting the ignition timing afterwards.
Fact sheet
- Difficulty: easy to medium
- Time needed: approx. 30–60 minutes plus timing adjustment
- Fits: VW Beetle, Karmann Ghia, Thing (181), VW Bus T1 and T2 with Type 1 engine; 123ignition also for Type 4 engines
- Important: switch off the ignition or disconnect the battery before wiring
What you need
- Small screwdrivers, spanner for the distributor clamp
- Multimeter for measuring the coil resistance
- Timing light for setting the ignition timing
- If needed: 3 Ω ignition coil (Bosch blue), distributor cap, rotor and ignition lead set
Why convert to electronic ignition?
The contact points are the wear part of a classic ignition: the contacts burn, the rubbing block wears, point gap and dwell drift – and the ignition timing drifts with them. A contactless ignition switches without mechanical parts. The timing stays stable, the engine starts better and runs more smoothly, and you no longer have to replace or adjust points.
Which solution suits you?
| Solution | How it works | Fits | Ignition coil | Adjustment |
|---|---|---|---|---|
| Conversion kit for the original distributor EMPI Accu-Fire, Ignitor-type conversion kit |
Module replaces points and condenser in your existing Bosch distributor – original look is kept | 12 V vehicles with a good Bosch distributor (from approx. 8/1968), with or without vacuum advance | approx. 3 Ω primary resistance (2.5–4.0 Ω) | Re-set timing with a timing light, no more dwell adjustment |
| Complete 009 distributor with electronics 009 with electronic ignition – our own brand, EMPI |
New centrifugal-advance distributor without vacuum unit, with built-in contactless ignition | Beetle, Thing and Bus T2 with 1.6 l Type 1 engine; a worn distributor is replaced at the same time | approx. 3 Ω, e.g. blue Bosch coil | Set timing; plug the vacuum port on the carburettor |
| 123ignition distributor without vacuum, with vacuum |
Electronically controlled distributor without flyweights, 16 advance curves selectable by switch | Type 1, Type 3 and Type 4 engines, 6 V and 12 V (not for 25/30 hp engines) | stock coil or high-performance coil, min. 1 Ω | Select the curve yourself, basic setting with LED, then check with timing light |
| Complete kit with performance distributor Ignition kit with 24 advance curves |
Electronic distributor with ball-bearing shaft; advance curve adjustable in 24 variants via interchangeable springs and bushes – with coil and leads | Beetle, Karmann, Bus T1 and T2 up to 1979 and Type 3; engines 1200–1600 cc (30–50 hp), 12 V only | matching high-performance coil included | Select curve, set timing |
All in one: our complete kits
- Ignition kit with 009 distributor – electronic 009 distributor, high-performance coil, Bosch ignition lead set and 4 W8AC spark plugs
- Complete ignition kit with performance distributor – electronic distributor with 24 adjustable advance curves, high-performance coil and ignition lead set
This way distributor, coil and leads are guaranteed to match – ideal if you want to overhaul the whole ignition anyway.
Rule of thumb: If your distributor is in good condition with no bearing play, a conversion kit is enough. If the distributor is worn, take a new 009 with electronics – for example our own brand – or go for a 123ignition. If you want to renew the whole ignition at once, choose a complete kit. If your carburettor has a vacuum port for the ignition, choose the 123ignition with vacuum – otherwise the version without.
Ignition coil: what matters
- Conversion kit and 009 with electronics: primary resistance approx. 3 Ω (range 2.5–4.0 Ω), for example the blue Bosch ignition coil 0 221 119 027. A coil with too low a resistance overheats and destroys the module.
- 123ignition: stock coil or high-performance coil with at least 1 Ω. Exception: engines that had electronic ignition from the factory (e.g. Type 4 or CT/CZ engines) – their coil is not suitable, you need a matching coil.
- Measuring: ignition off, disconnect the wires at terminals 1 and 15 and measure between terminal 1 and 15 with a multimeter.
Wiring it correctly
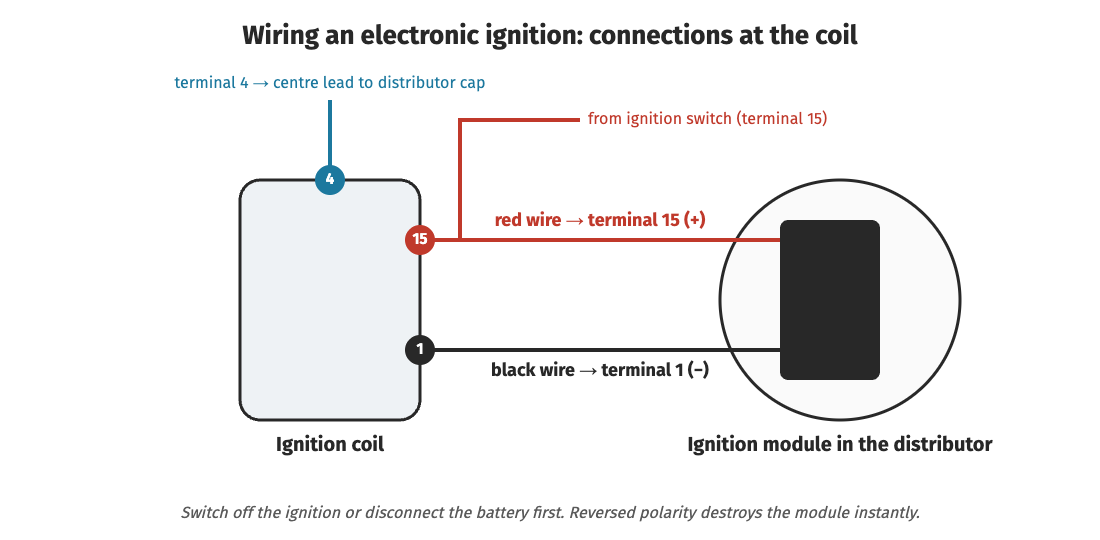
For conversion kits and the 009 with electronics, the red wire goes to terminal 15 (+) of the coil – where the wire from the ignition switch also arrives – and the black wire to terminal 1 (−), where the wire from the points used to be. Terminal 4 is the high-tension output to the distributor cap. On the 123ignition the wires also go to terminals 15 and 1 – follow the wiring diagram in its manual.
Caution: Switch off the ignition or disconnect the negative battery terminal before wiring. Reversed wires destroy the ignition module instantly. Never disconnect ignition wires with the engine running and do not touch high-tension parts.
Step by step: conversion kit in the original distributor
- Ignition off or battery disconnected.
- Remove the distributor cap and rotor. The plug leads stay in the cap.
- Remove points and condenser and disconnect the points wire at the coil (terminal 1). Clean dirt and oil from the base plate and cam.
- Fit the module like the old points and secure it with the screw. Route the wires through the opening in the distributor housing. On distributors with a vacuum unit the mounting plate may need slight adjustment.
- Press the magnet / trigger sleeve firmly onto the cam of the distributor shaft. Turn the shaft by hand: the sleeve must not touch the module anywhere.
- Refit rotor and cap, then connect red to terminal 15 and black to terminal 1 of the coil.
- Start the engine and re-set the timing with a timing light – see Ignition timing. You no longer need to set the dwell.
Step by step: 009 distributor with electronics
This applies to our 009 with electronic ignition and the ignition kit with 009 distributor. The cap and rotor from an original 009 also fit.
- Set cylinder 1 to TDC and note the rotor position – as described in our guide Installing the distributor.
- Remove the old distributor, pull off the vacuum hose and close the vacuum port on the carburettor with a blanking plug.
- Fit the new 009, align the rotor with cylinder 1, tighten the clamp lightly.
- Connect the wires: red to terminal 15, black to terminal 1. Fit the plug leads in the firing order 1-4-3-2.
- Set the ignition timing and tighten the distributor clamp.
Step by step: installing a 123ignition
- Select the advance curve: behind an Allen screw at the bottom of the housing is a rotary switch with 16 positions (0–F). The correct position for your engine is in the table of the 123 manual – easiest via the Bosch number of your previous distributor. Set the switch and screw the plug back in tightly.
- Set the engine to the static timing point: cylinder 1 on the compression stroke, crankshaft at the mark given in the 123 manual for your curve.
- Remove the old distributor and fit the 123ignition so the rotor points to cylinder 1.
- Connect only the red wire, not the black one yet. Switch on the ignition.
- Slowly turn the housing until the green LED below the rotor just lights up – on the VW the rotor turns counterclockwise, so turn the housing clockwise. Tighten the clamp in this position.
- Ignition off, connect the black wire; on the vacuum version fit the hose from the carburettor.
- Start the engine and check the timing with a timing light.
Mechanic's tips
- Keep the old points: with a conversion kit the distributor stays unchanged. Points and condenser fit in your on-board tool bag – so you can always get home in an emergency.
- No solid-core ignition leads: use suppressed ignition leads and connectors. The stronger sparks of an electronic ignition also place higher demands on cap, rotor and leads.
- Check the spark plugs: after the conversion, new plugs with the correct gap are worthwhile.
- Don't leave the ignition on unnecessarily: don't leave the ignition switched on for long with the engine stopped – this spares coil and module. The 123ignition switches off the current itself after about one second.
- 6 V vehicles: the conversion kits, the 009 with electronics and the performance kit are 12 V only. For 6 V only the 123ignition is an option.
Common mistakes
- Wires swapped: the module is destroyed instantly – check twice before switching on.
- Wrong ignition coil: too low a resistance overheats the module.
- Timing not re-set: even with a conversion kit the timing shifts – always check with a timing light.
- Worn distributor: if the shaft has play, the timing fluctuates even with electronics. Better to fit a new distributor.
- Vacuum port left open: when converting to a 009 without vacuum, close the port on the carburettor – otherwise the engine draws false air.
FAQ
Is an electronic ignition worth it on a Beetle?
Yes, especially if you drive a lot. The timing stays stable, adjusting points is no longer necessary and the engine starts better.
Which ignition coil do I need for electronic ignition?
For conversion kits and the 009 with electronics, a coil with approx. 3 Ω primary resistance, for example the blue Bosch coil. The 123ignition runs with the stock coil or a high-performance coil from 1 Ω.
Do I have to set the dwell after the conversion?
No. The dwell is controlled by the electronics. You only need to set the ignition timing.
How do I wire the electronic ignition?
Red wire to terminal 15 (+) of the coil, black wire to terminal 1 (−). Switch off the ignition or disconnect the battery first.
With or without vacuum – which 123ignition do I need?
If your carburettor has a vacuum port for timing advance (e.g. 34 PICT-3), take the vacuum version. For engines without this port or with a 009 distributor, take the version without.
Matching parts and more guides
- Electronic ignition: EMPI Accu-Fire conversion kit, Ignitor-type conversion kit, 009 with electronic ignition (own brand), EMPI 009 with electronic ignition, 123ignition without vacuum, 123ignition with vacuum
- Complete kits: Ignition kit with 009 distributor, coil, leads and plugs, Complete ignition kit with performance distributor
- Also: Bosch 3 Ω ignition coil, distributor cap, rotor, Bosch ignition lead set, carburettor blanking plug
- Categories: VW Beetle distributor & ignition, VW Bus T1 ignition, VW Bus T2 ignition
- More guides: Ignition timing, Installing the distributor, Carburettor adjustment – all guides in our Guides & Tips overview.
All information without guarantee. Always follow the installation instructions of the respective manufacturer. All work is carried out at your own risk.