
Bleeding and adjusting the brakes on the VW Beetle and Bus: sequence, handbrake and wear limits
In short: On the VW Beetle and Bus you bleed the brakes in the sequence rear right, rear left, front right, front left – with DOT 4 brake fluid, which you change every 2 years. Drum brakes are adjusted at the adjusters so that the drum just turns freely. On the Beetle the handbrake starts to work from the 2nd notch and holds from the 4th notch. Linings are worn at 2.5 mm (drum) or 2.0 mm (disc).
Fact sheet
- Difficulty: medium
- Time needed: bleeding approx. 45 minutes, adjusting approx. 30 minutes
- Fits: VW Beetle, Karmann Ghia, Thing (181), VW Bus T1 and T2
- Important: brakes are safety-critical – always test the brakes after any work
What you need
- Jack and safe axle stands
- Ring spanner for the bleed valves, clear hose and a glass jar
- Fresh DOT 4 brake fluid (approx. 1 litre / 1 US quart for a complete change) and a helper for the pedal
- Screwdriver for adjusting the drum brakes
- If needed: brake shoes, wheel cylinder or brake hose
Why adjusting and bleeding matter
Brake fluid absorbs water over time. This lowers its boiling point, and under heavy braking vapour bubbles can form – the pedal goes soft or sinks to the floor. Air in the system has the same effect. The drum brakes on the Beetle and Bus are not self-adjusting: as the linings wear, the pedal travel gets longer and longer. Regular adjustment and fresh brake fluid keep your classic braking safely and evenly.
The right values
| Value | Spec |
|---|---|
| Brake fluid | DOT 4 (VW: DOT 3 or DOT 4), change every 2 years |
| Bleeding sequence | rear right – rear left – front right – front left |
| Quantity when changing | approx. 500 cm³ (17 fl oz) per bleed valve; Bus caliper with 2 valves: lower approx. 500 cm³, upper approx. 100 cm³ (3.4 fl oz) |
| Fluid level in reservoir | up to the mark; without a mark approx. 15–20 mm (0.6–0.8 in) below the filler opening |
| Brake pedal free play Beetle | 5–7 mm (0.2–0.28 in), felt by hand |
| Brake pedal free travel Bus T2 | max. ⅓ of the pedal travel |
| Handbrake Beetle | starts to brake from the 2nd notch, from the 4th notch the rear wheels can no longer be turned |
| Handbrake Bus T2 | free travel according to VW 7 notches |
You will find the torque specs for caliper, backing plate, wheel cylinder and brake drum in our guide Chassis torque specs.
Bleeding sequence
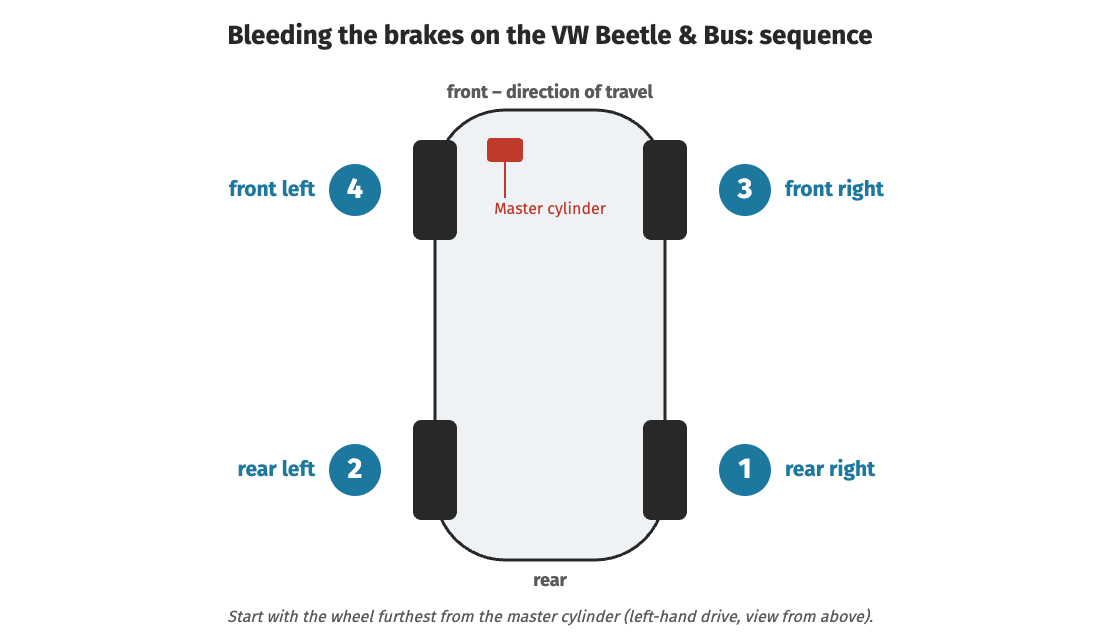
Start at the wheel furthest from the master cylinder and work towards the nearest one. This applies to single and dual circuit systems, drum and disc brakes.
Step by step: bleeding the brakes
- Fill the reservoir and never let it run empty during the job – otherwise the system draws in air again.
- Start at the rear right: remove the dust cap from the bleed valve, fit a clear hose and hang the other end in a jar with a little brake fluid. Hold the jar higher than the valve.
- Open the valve (about half a turn). The helper presses the pedal down quickly and lets it return slowly. Repeat until no more air bubbles can be seen in the hose.
- Close the valve while the helper holds the pedal down. Remove the hose, refit the dust cap.
- Continue in sequence rear left, front right, front left. On the Bus with a caliper with two valves, bleed the lower valve first, then the upper one.
- Top up the fluid and check the pedal: after a short free travel it must feel firm and must not slowly sink.
Changing the brake fluid: proceed in the same way, but pump at each valve until clear, fresh fluid comes out – allow approx. 500 cm³ (17 fl oz) per valve.
Caution: Never reuse drained brake fluid – it contains air and dirt. Brake fluid attacks paint: wash off splashes immediately with water. Old brake fluid must be disposed of as hazardous waste. Never work under a vehicle that is only supported by the jack.
Step by step: adjusting the drum brakes
- Jack up the vehicle and release the handbrake.
- Press the brake pedal several times so the brake shoes centre in the drum.
- Find the adjusters: turn the wheel until the hole in the brake drum lines up with the adjuster (older models), or pull the rubber plug out of the back of the backing plate (later models). On the Beetle there are two adjusters per wheel – one for each brake shoe.
- Set the first adjuster: turn it with the screwdriver until the drum rubs slightly when turned. Then back it off just until it turns freely again.
- Set the second adjuster the same way – it is turned in the opposite direction.
- Adjust all four wheels one after the other, refit the plugs and test the brakes.
On the Bus the adjustment works on the same principle. The number and position of the adjusters depend on the year – ask us if you are unsure.
Step by step: adjusting the handbrake
- Adjust the foot brake first, then the handbrake.
- Jack up the rear of the vehicle. On the Beetle pull back the cover on the handbrake lever – at the front of the lever you will find the adjusting and lock nuts of the two handbrake cables.
- Tighten the adjusting nuts until the rear wheels can just still be turned freely with the handbrake released.
- Check: pull the lever up 2 notches – both rear wheels must brake evenly. From the 4th notch they must no longer turn by hand.
- Tighten the lock nuts. For the Bus T2, VW specifies a free travel of 7 notches on the handbrake lever.
Checking wear limits
| Part | New | Wear limit / note |
|---|---|---|
| Lining, drum brake (Beetle and Bus) | 4.0 mm (oversize 4.5 mm) | 2.5 mm (0.10 in) – lining measured without the brake shoe |
| Pad, disc brake (Beetle and Bus) | – | 2.0 mm (0.08 in) |
| Brake drum Beetle | 230 mm (9.06 in) inside diameter | machine to max. 231.5 mm (9.11 in), wall thickness afterwards at least 4 mm; machined drums need oversize linings |
| Brake disc Beetle (1500, 1600, 1302 S, 1303 S, Karmann) | 9.5 mm (0.37 in) | machine only to 8.5 mm, wear limit 8.0 mm (0.31 in), runout max. 0.2 mm (0.008 in) |
On the Beetle you can check the drum brake lining thickness through the holes in the backing plate without removing the drum. Always replace linings on both sides of an axle at the same time and with the same lining material. Oily linings cannot be cleaned – they must be replaced, and the cause (usually a leaking wheel cylinder or oil seal) must be fixed.
Mechanic's tips
- Seized bleed valves: spray with penetrating oil a few days beforehand and only loosen with a ring spanner – a sheared valve will cost you a wheel cylinder.
- Pedal won't go firm: check master cylinder, wheel cylinders and brake hoses for leaks. A hose that balloons when braking must be replaced.
- Brakes pull to one side: usually one side is adjusted wrongly, a wheel cylinder is sticking or a lining is oily.
- Brakes get hot and drag: check the free play at the brake pedal. Without it, the compensating port in the master cylinder stays closed and the brakes no longer release properly.
- Converting to dual circuit or disc brakes: many Beetle owners upgrade – you will find matching disc brake conversion kits in our shop.
Common mistakes
- Reservoir pumped dry: then there is air in the system again and you have to start over.
- Only one side adjusted: the car pulls to one side. Always adjust both wheels on an axle equally.
- Handbrake adjusted before the foot brake: the handbrake uses the same shoes – foot brake first, then handbrake.
- Old brake fluid topped up: only use fresh fluid from a sealed container.
FAQ
In which order do I bleed the brakes on the Beetle?
Rear right, rear left, front right, front left – from the wheel with the longest line to the one with the shortest.
Which brake fluid does the VW Beetle need?
DOT 4 brake fluid. VW specifies DOT 3 or DOT 4; DOT 4 has a higher boiling point. Change it every 2 years.
How many notches does the Beetle handbrake have?
Correctly adjusted, it starts to brake from the 2nd notch, and from the 4th notch the rear wheels can no longer be turned by hand.
When are the brake linings worn?
On drum brakes at 2.5 mm lining thickness (measured without the shoe), on disc brakes at 2.0 mm.
Why do I have to adjust the drum brakes?
The drum brakes on the Beetle and Bus have no automatic adjustment. As the linings wear, the pedal travel gets longer – you compensate for this at the adjusters.
Matching parts and more guides
- Beetle: front brake shoes, rear brake shoe set, rear wheel cylinder, rear brake drum, brake disc, dual circuit master cylinder, handbrake cable, front brake hose
- Bus: front brake shoes T1/T2 up to 7/1970, rear brake shoes T2b, front brake pads T2b, brake disc T2b, master cylinder T2
- Categories: VW Beetle brakes, VW Bus T1 brakes, VW Bus T2 brakes
- More guides: Chassis torque specs, VW Bus T2 technical data, Clutch adjustment – all guides in our Guides & Tips overview.
All information without guarantee. Work on the brake system is carried out at your own risk. If you are unsure, have the brakes checked by a specialist workshop.